
ボットの会話でカルーセルと連動
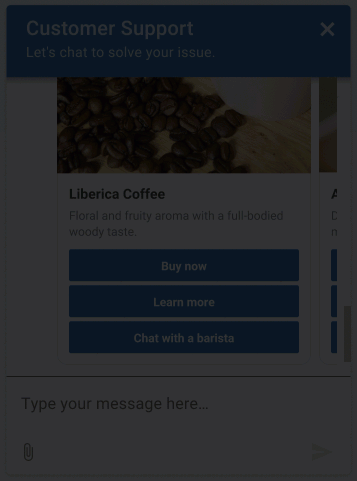
カルーセルは、一連のカードを含むボットリプライです。 カルーセルを操作するために、お客様はカードのオプションをスクロールし、カードに関連するボタンを使ってオプションを選択します。
カルーセルは、高度なオプションやアクションを自動で提供することで、ボットとの会話を円滑にします。 カルーセルは、説明文、画像、タイトル、テキスト、そしてオプションで外部ウェブサイトを参照できる一連のカードを提示することで、顧客に洗練された選択肢を提供します。 カードの詳細については、ボット会話でカードを使用する を参照してください。
例: Genesys Web Messengerのカルーセル
ボットおよびチャネルサポート
現在サポートされているボット:
- Amazon Lex V2
- Google Dialogflow
- Google Dialog Flow CX
- Bot Connector
現在サポートされているボット:
- Genesys Web メッセージング
- Facebook Messenger
- Instagram(ベータ版)
- WhatsApp Messenger
カルーセル実装の制限事項
ボット返信にカルーセル構造を設計・実装する際は、これらの制限を考慮してください。
- 1つのカルーセルに最大10枚のカードを実装することができます。
- カード構造体のボタンに設定するペイロードは、カルーセル内の全てのカードで一意である必要がある。
- TwitterとWhatsAppは、カルーセル構造に対応していません。
- Amazon Lex V1では、カスタムJSONの文字数が1000文字に制限されています。 カルーセルを作成するために1000文字以上を使用しなければならない場合、この制限は実装に影響を与える可能性があります。
- WhatsApp、LINE、Twitterはデフォルトアクションに対応していません。 これらのアプリケーションでデフォルトのアクションを設定した場合、アプリケーションはそれを無視します。
Amazon Lex V2
Amazon Lex V1ボットにカルーセルを組み込む方法を説明し、使用例やその他のリソースを掲載します。
- Genesys AppFoundryからAmazon Lex統合をインストールする
- Amazon Lex アプリのアクセス権限を使用して IAM ロールを設定します。
- Genesys CloudでのLexインテグレーションの設定とアクティブ化
- AWS Lex Consoleでカルーセルオプションを設定するには、このカスタムJSONを使用して、ボットのインテントに応じたカードを定義してください。 注意: Amazon Lex V1では、JSONの長さを1000文字までに制限しています。
{
    "genesys_prompt": "String", // optional message text
    "genesys_carousel": [
         {
              "title": "String", // mandatory text to show in the title
              "description": "String", // optional text to show in the description
              "image": "URL", // optional URL of an image
              "defaultAction":  { // optional default button action
                    "type": "String", // Describes the type of action. Valid values Link Postback
                    "text": "String", // The response text from the button click
                    "payload": "String", // Text to be returned as the payload from a ButtonResponse when a button is clicked. The payload and text are a combination which will have to be unique across each card and carousel in order to determine which button was clicked in that card or carousel.
                    "url": "String" // A URL of a web page to direct the user to.
              },
              "actions": [
                    {
                         "type": "String", // Describes the type of action.  Valid values Link Postback
                         "text": "String", // The response text from the button click
                         "payload": "String" // Text to be returned as the payload from a ButtonResponse when a button is clicked. The payload and text are a combination which will have to be unique across each card and carousel in order to determine which button was clicked in that card or carousel.
                    },
                    {
                         "type": "String", // Describes the type of action.  Valid values Link Postback
                         "text": "String", // The response text from the button click
                         "url": "String" // A URL of a web page to direct the user to.
                    }
              ]
         }
    ]
}
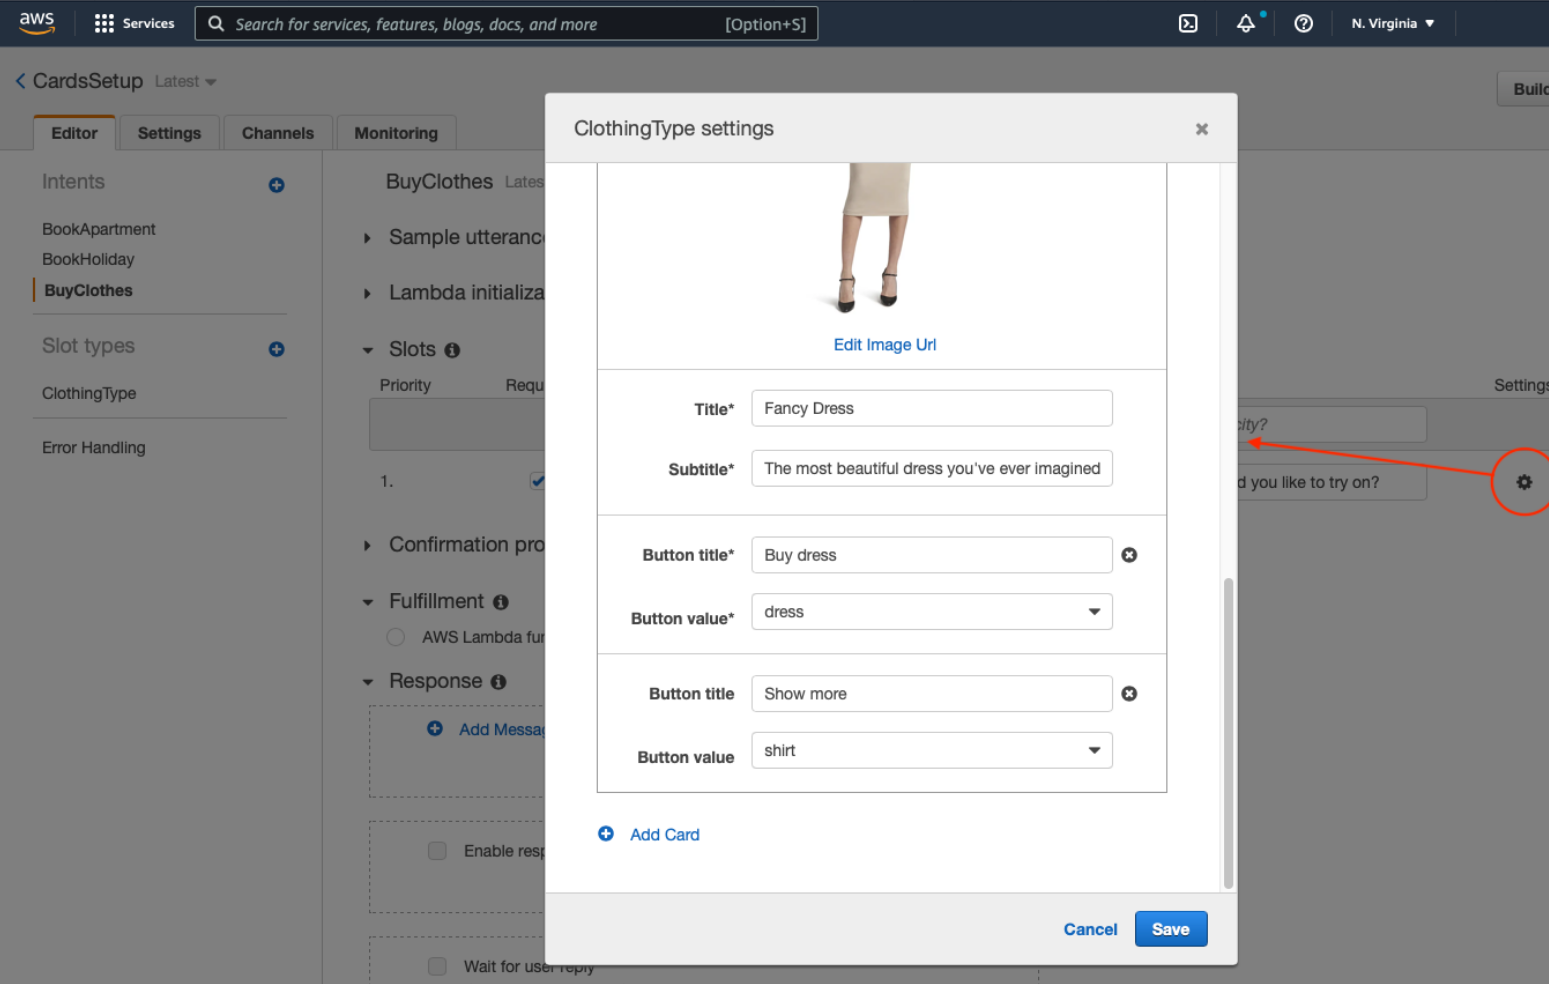
カードオプションを使用してボットのスロットを埋めるには、AWS Consoleのカードエディタを使用します。 カルーセルを作成するには、Add Card オプションを使用し、カルーセルにカードを追加してください。
画像をクリックして拡大します。
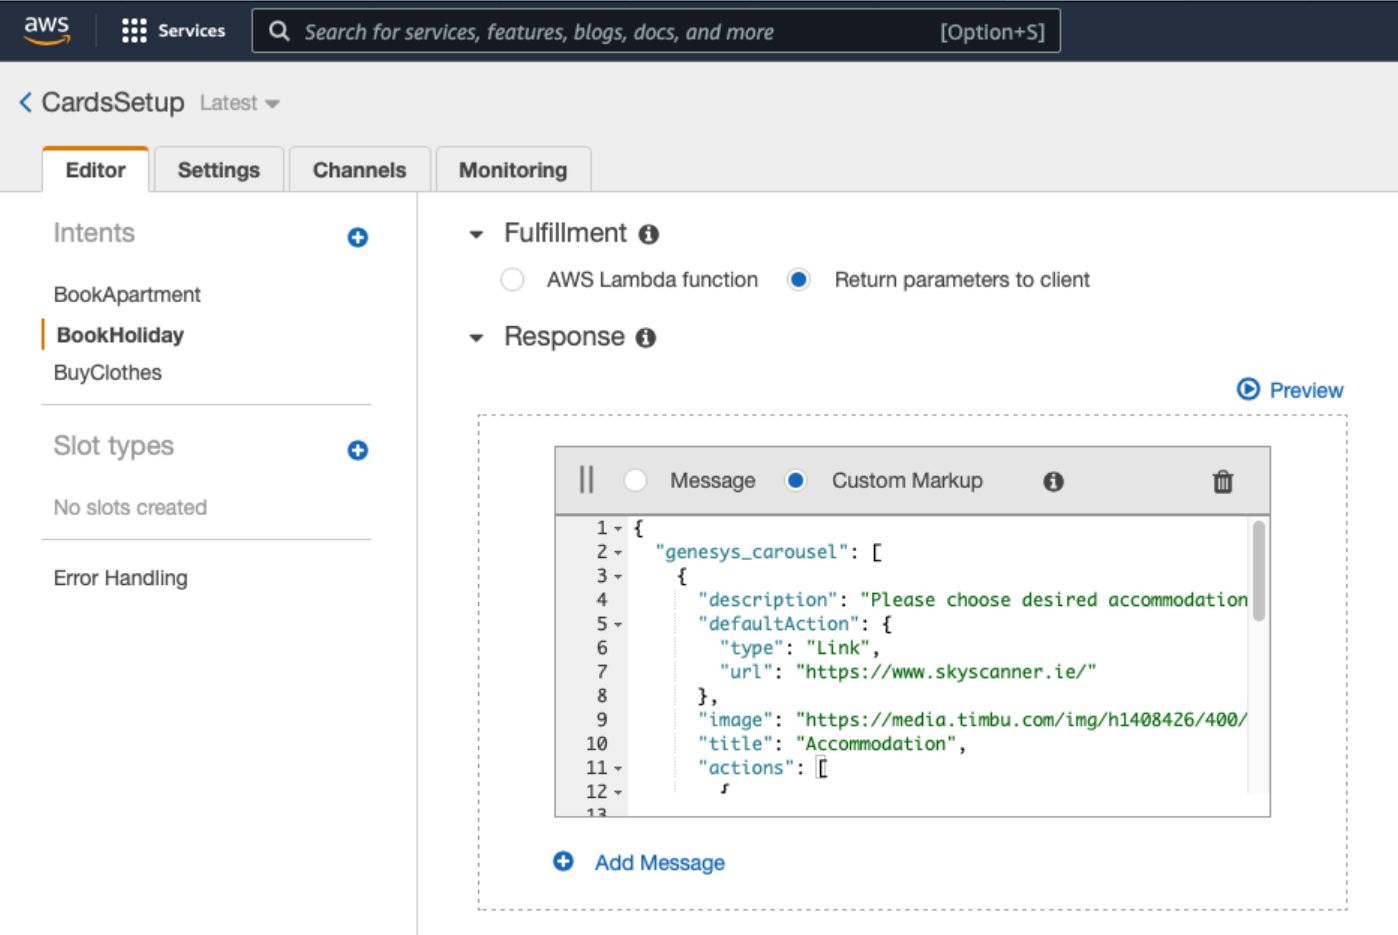
カルーセルオプションを使用してボットのインテントを切り替えるには、AWS Lex Consoleで、前のセクションのカスタムJSONをResponse入力フィールドにコピーしてください。 複数のカード構造を定義し、カルーセルを作成する。
画像をクリックして拡大します。
もっと詳しく知る:
Google Dialogflow ESのみ:
これらのセクションでは、Google Dialogflow ESまたはCXボットにカルーセルを組み込む方法について説明し、使用例やその他のリソースを掲載しています。
- Genesys AppFoundryからGoogle Dialogflow統合をインストールする
- Google Dialogflowプラットフォームサービスアカウントの認証情報を構成します。
- Google Dialogflow統合を有効にする
- Dialogflowコンソールでカルーセルを設定するには、このカスタムJSONを使用して、ボットのインテントに応じたカードオプションを定義します。 複数のカード構造を使い、カルーセルを作る。
{
   "genesys_prompt": "String", // optional message text
   "genesys_carousel": [
        {
             "title": "String", // mandatory text to show in the title
             "description": "String", // optional text to show in the description
             "image": "URL", // optional URL of an image
             "defaultAction":  { // optional default button action
                   "type": "String", // Describes the type of action. Valid values Link Postback
                   "text": "String", // The response text from the button click
                   "payload": "String", // Text to be returned as the payload from a ButtonResponse when a button is clicked. The payload and text are a combination which will have to be unique across each card and carousel in order to determine which button was clicked in that card or carousel.
                   "url": "String" // A URL of a web page to direct the user to.
             },
             "actions": [
                   {
                        "type": "String", // Describes the type of action.  Valid values Link Postback
                        "text": "String", // The response text from the button click
                        "payload": "String" // Text to be returned as the payload from a ButtonResponse when a button is clicked. The payload and text are a combination which will have to be unique across each card and carousel in order to determine which button was clicked in that card or carousel.
                   },
                   {
                        "type": "String", // Describes the type of action.  Valid values Link Postback
                        "text": "String", // The response text from the button click
                        "url": "String" // A URL of a web page to direct the user to.
                   }
             ]
        }
   ]
}
カルーセルオプションを使ってボットのインテントを切り替えるには、Dialogflowコンソールで、前節のカスタムJSONをResponse入力フィールドに追加します。
Google Cloud Dialogflow ESの例
画像をクリックして拡大します。

カルーセルオプションを使用してボットのスロットを埋めるには、前のセクションのカスタムJSONをWebhookに使用します。 複数のカード構造を使い、カルーセルを作る。 この目的でAWSLambdaを使用することもできます。 詳しくは、Google Cloud Dialogflow ESガイドのWebhook for slot filling を参照。
Bot Connector
これらのセクションでは、クイック返信をGenesys Bot Connectorボットに組み込む方法と、その他のリソースについて説明します。