
知識ベースV2の質問と回答の記事をフォーマットする
前提条件
- Genesys Cloud CX 1 Digital Add-on II、Genesys Cloud CX 2、Genesys Cloud CX 2 Digital、Genesys Cloud CX 3、Genesys Cloud CX 3 Digital、またはGenesys Cloud CX 4ライセンス
- ナレッジ >すべてののアクセス権
- Analytics >Knowledge Aggregate >All permissions.
- 対応資産>資産>全て権限(画像をアップロードする)
フォントスタイルの変更、フォントサイズの変更、フォントカラーの変更、背景色の変更、テキストの強調、配置の変更、箇条書きリストや番号付きリストの追加など、ナレッジベース記事の一般的な更新を行うことができます。 また、リッチメディアや表などを含めて記事をカスタマイズすることもできる。 これらのアップデートはタッチポイントに表示されます。 これらのセクションでは、読者に合わせて質問と回答の記事を作成するためのさまざまなタスクの実行方法について説明します。
メモ:
- 質問と回答の記事は、ナレッジ ベースと同じ言語で作成するようにしてください。
- 質問と回答には、最低5文字を含める必要があります。
- 記事コンテンツまたはアップロードされるファイルの最大サイズは 190 KB です。
- ナレッジ・ベースの最大記事数は15,000。
- 一つの組織における知識ベースの最大数は500である。
- ハイパーリンクでは、文字列の構築にアンパサンド (&) を含めることはできません。
- 制約の詳細については、Developer Center のLimits を参照してください。 FAQの作成方法の詳細については、を参照してください。 ナレッジワークベンチFAQ作成のヒント。
メモ: 選択するタッチポイントによって機能は異なる。 詳細については、チャネル、ボット、タッチポイントの機能比較。
- 管理をクリックします。
- ナレッジ の下にある、記事 をクリックします。
- クリックメニュー>知識>記事。
- 新しいフローを作成するか、既存のフローを開きます。
- 既存の質問と回答の記事を開くか、新しいものを作成する。注記: 既存の記事にタッチポイントとセグメントを含む複数のバリエーションを持つ既存の記事を選択した場合、記事の詳細を表示するには、次の手順を実行します。
- リストからバリエーションを選択します。
- クリックバリエーションの詳細。バリエーションの詳細ダイアログ ボックスが開きます。
- セグメント情報を表示するには、「セグメント」の下で、表示するセグメントをクリックして展開します。
- 記事本文を追加する。
- 必要に応じて、変更するテキストをダブルクリックして選択し、次の手順に従って記事の書式を設定します。
- フォント スタイルを変更するには、行または段落内の任意の場所にカーソルを置き、段落の末尾にある矢印をクリックして、次のいずれかのオプションを選択します。
- パラグラフ(デフォルト)
- 見出し1~6
- 書式なしフォーマット
- フォントサイズを変更するには、Medium の最後にある矢印をクリックし、以下のオプションから1つを選択します:
- XX-スモール
- X-スモール
- 小
- ミディアム(デフォルト)
- 大
- Xラージ
- XX-ラージ
- フォントの色を変更するには、テキストの色
 次のいずれかの手順を選択します。
- 定義済みのフォント色を選択します。
- [カスタムカラー]をクリックします。カラーピッカーが開きます。 色の RGB または 16 進コードを入力し、「保存」をクリックします。
- 単語、フレーズ、段落にハイライトを追加するには、背景色の横にある矢印をクリックします。
 次のいずれかの手順を選択します。
- 定義済みのハイライト色を選択します。
- クリックカスタムカラー。カラーピッカーが開きます。 色のRGBまたは16進コードを入力してクリックします保存。
- テキストの強調を調整するには、ツールバーの書式オプションから選択します:
- 太字
- 斜体
- 下線
- 取り消し線
- 配置のテキストを変更するには、行または段落の任意の場所にカーソルを置き、アライメントをクリックし、オプションを選択します。
- インデントの減少
- インデントの増加
- 左揃え
- 中央揃え
- 右揃え
- 箇条書きリストを作成するには、箇条書きを追加するテキストを選択し、箇条書きリスト。注記:デフォルトのディスクスタイルを変更するには、箇条書きリスト 円形または正方形を選択します。
- 番号付きリストを作成するには、番号を追加するテキストを選択し、番号付きポイント。注記:デフォルトの番号スタイルを変更するには、番号付きポイント小文字のアルファベットまたは小文字のローマ字を選択します。
- フォント スタイルを変更するには、行または段落内の任意の場所にカーソルを置き、段落の末尾にある矢印をクリックして、次のいずれかのオプションを選択します。
Genesys Cloud は、.jpg、.jpeg、.png、.gif の画像形式をサポートしています。
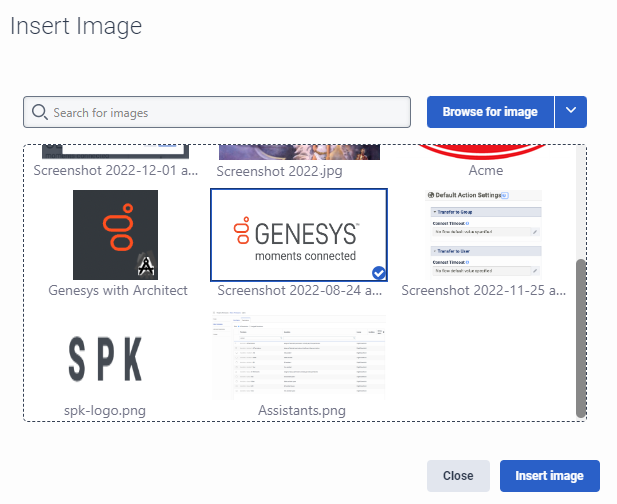
- 画像 をクリックし、以下のいずれかを実行します。
- 既存の画像を選択する場合は、以下の手順で行います。
- 使いたい画像を検索する。
- クリックすると、画像が選択されます。
- 画像を挿入する をクリックします。
- ローカルに保存された画像を選択するには、次の手順に従います。
- 画像を参照する をクリックします。
- 画像をダイアログボックスにドラッグ&ドロップするか、クリックしてローカルに保存してある画像を検索します。
- クリック アップロードする。
- ハイパーリンクのURLから画像を選択する場合は、以下の手順で行います。
- 下向き矢印 の横にある画像を参照 をクリックします。
- URLから画像を挿入する をクリックします。
- 追加する画像が含まれるURLを入力します。
- 画像を挿入する をクリックします。
- 既存の画像を選択する場合は、以下の手順で行います。
- 画像のサイズを変更するには、次のいずれかの手順に従います。
- 画像をクリックしてください。画像の周囲に青い枠線が表示されます。 青い部分をクリック画像の隅にあるポインターをポイントし、画像を希望のサイズまでドラッグします。
- 画像を右クリックし、表示されるメニューから画像を編集。[画像の編集] ダイアログ ボックスが開きます。代替の説明、幅、および単位での測定値を調整します。
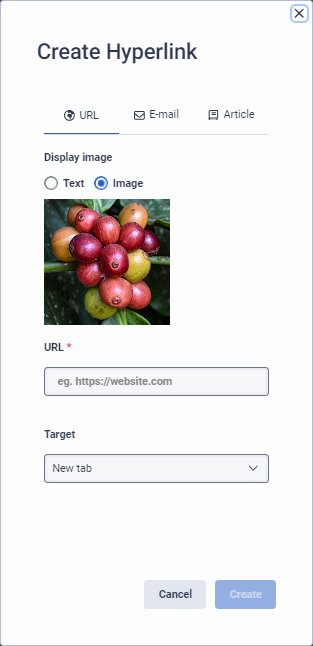
- 画像をアップロードして挿入した後、その画像をハイパーリンク URL にリンクするには、次の手順を実行します。
-
- 挿入した画像をクリックして選択します。
- クリックハイパーリンクを作成。[ハイパーリンクの作成] ダイアログ ボックスが開きます。

- 作成するにはメールアドレスリンク タイプの場合は、次の手順に従ってください。
- デフォルトのままメールアドレスタブ。
- 画像の表示の下で、画像の表示をリンクするには、デフォルトのままにしておきます画像設定。逆に、URL文字列以外の文言を表示するには、文章顧客に表示するテキストを入力します。
- URLの下に、完全修飾URL文字列を追加します。注記: 現在サポートされている転送プロトコルは
https。 - Target(ターゲット)」で、デフォルトの「New(新規作成)」タブの設定を変更しない。
- 電子メール リンク タイプを作成するには、次の手順に従います。
- クリック電子メールタブ。
- 画像の表示の下で、画像の表示をリンクするには、デフォルトのままにしておきます画像設定。逆に、URL文字列以外の文言を表示するには、文章顧客に表示するテキストを入力します。
- [電子メール] の下に、完全な電子メール アドレスを入力します。
- アクションはデフォルトのままにしておきますオープンメールプロバイダー設定は変更されません。
- 記事リンク タイプを作成するには、次の手順に従います。
- 「記事」タブをクリックします。
- 画像の表示の下で、画像の表示をリンクするには、デフォルトのままにしておきます画像設定。逆に、URL文字列以外の文言を表示するには、文章顧客に表示するテキストを入力します。
- 記事のリンクを検索して選択します。
- 作成するをクリックします。
Genesys Cloud は次のメディア形式をサポートしています。Vimeo と YouTube。
注記:選択するタッチポイントによって機能は異なる。詳細については、チャネル、ボット、タッチポイントの機能比較。
- クリックメディアの挿入/編集。[ビデオの追加/編集] ダイアログ ボックスが開きます。

- 「メディア URL」の下に、追加するメディア ソースの URL を入力します。
- (オプション)メディアファイルの幅と高さを調整します。
- 参加者がメディアファイルのサイズを調整できるようにするには、Constrain proportions をクリックします。 コンストレイン・プロポーション が変わる。
- 保存するをクリックします。

URL、Eメールアドレス、または同じナレッジ・ベースからの記事を、記事内のハイパーリンクとして追加することができます。 また、これらのハイパーリンクをテキストとして、またはアップロードした画像として表示することもできます。
メモ: このオプションは、ナレッジ ポータルでのみ使用できます。
- クリックハイパーリンクを作成。[ハイパーリンクの作成] ダイアログ ボックスが開きます。
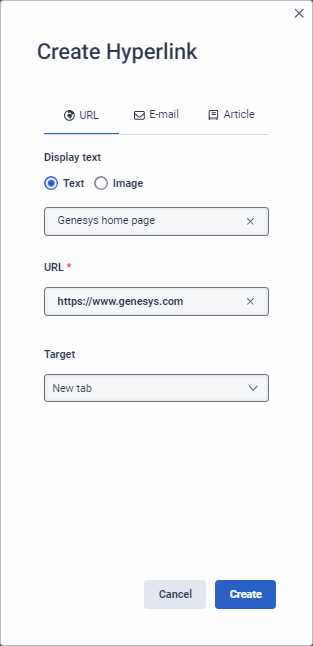
- URLハイパーリンクを作成するには、以下の手順に従ってください:
- そのままメールアドレスタブ。
- テキストの表示」で、以下のいずれかの手順を実行する:
- テキスト」オプションを選択したままにして、URL文字列以外の文言を表示するには、顧客に表示するテキストを入力します。
- 画像 をクリックし、新しい画像をアップロードするか、既存の画像を選択するか、画像のURLを追加します。
- URLの下に、完全修飾URL文字列を追加します。注記: 現在サポートされている転送プロトコルは
https。 - Target(ターゲット)」で、デフォルトの「New(新規作成)」タブの設定を変更しない。
- 電子メールアドレスをハイパーリンクとして作成するには、以下の手順に従ってください:
- クリック電子メールタブ。
- [表示テキスト] で、次のいずれかの手順を実行します。
- テキスト]オプションを選択したまま、電子メールアドレス以外の文言を表示するには、顧客に表示するテキストを入力します。
- 画像 をクリックし、新しい画像をアップロードするか、既存の画像を選択します。
- Eメール」の下に、完全なEメールアドレスを入力します。
- アクションの下で、オープンメールプロバイダー設定は変更されません。
- 同じナレッジベース内の別の記事へのリンクを作成するには、以下の手順に従ってください:
- クリック記事タブ。
- [表示テキスト] で、次の手順を実行します。
- Text オプションを選択したままにして、記事の文字列以外の文言を表示するには、顧客に表示するテキストを入力します。
- 画像 をクリックし、新しい画像をアップロードするか、既存の画像を選択します。
- 記事」で、現在の記事からリンクしたい記事を検索し、選択する。
- バリエーション」で、このハイパーリンクを提供する適切なバリエーションを選択します。
- 作成するをクリックします。
- 画像のサイズを変更するには、次のいずれかの手順に従います。
- 画像をクリックしてください。画像の周囲に青い枠線が表示されます。 青い部分をクリック画像の隅にあるポインターをポイントし、画像を希望のサイズまでドラッグします。
- 画像を右クリックし、表示されるメニューから画像を編集。[画像の編集] ダイアログ ボックスが開きます。代替の説明、幅、および単位での測定値を調整します。

メモ: 選択したタッチポイントによって、一部の機能が制限される。 たとえば、Messenger タッチポイントのテーブルはサポートされていません。 詳細については、チャネル、ボット、タッチポイントの機能比較。
- ルールを作成します。
- クリックします。 タブ. 契約が表示されます。
- Table にカーソルを合わせ、希望の列数と行数がハイライトされるまでグリッドを動かす。
- 一般的な変更を行うには、テーブル内の任意の場所をクリックし、表示されるメニューから次のいずれかのアクションを実行します。
- テーブルのプロパティを開く
- テーブルを削除する
- 前に行を挿入
- 行を挿入
- 行を削除
- 前に列を挿入
- 列を挿入
- 列を削除
- セルのプロパティを設定するには、書式を設定したいセルまたはセルを選択し、Table >Cell をクリックし、表示されるメニューから以下のステップを実行する:
- セル・フォーマットを設定するには、Cell Properties をクリックする。 [プロパティ] ダイアログボックスが表示されます。
- Generalタブで、これらのオプションのいずれかをカスタマイズする:
- 幅
- 高さ
- セルタイプ(ヘッダーセルまたはレギュラーセル)
- スコープ(行、列、行グループ、列グループ)
- 横軸揃え
- 垂直アライメント
- Advancedタブで、オプションのボーダー設定を行います:
- ボーダー幅
- ボーダースタイル
- ボーダーの輪郭の色
- ボーダーの背景色
- 保存するをクリックします。
- Generalタブで、これらのオプションのいずれかをカスタマイズする:
- セルをマージするには、セルをマージ をクリックします。
- セルを分割するには、セルを分割。
- セル・フォーマットを設定するには、Cell Properties をクリックする。 [プロパティ] ダイアログボックスが表示されます。
- 行のプロパティを設定するには、書式を設定したい行を選択し、Table >Row をクリックし、表示されるメニューから以下の手順に従う:
- 選択範囲の前に行を挿入するには、Insert row before をクリックする。
- 選択行の後に行を挿入するには、 Insert row after をクリックする。
- リングを削除するには、Delete Ring をクリックします。
- 行プロパティを書式設定するには、行プロパティ をクリックする。 [プロパティ] ダイアログボックスが表示されます。
- Generalタブで、これらのオプションのいずれかをカスタマイズする:
- 行のタイプ(ヘッダー、ボディ、フッター)
- アライメント(左、中央、右)
- 行の高さ
- Advancedタブで、オプションのボーダー設定を行います:
- ボーダースタイル
- ボーダーの輪郭の色
- ボーダーの背景色
- 保存するをクリックします。
- Generalタブで、これらのオプションのいずれかをカスタマイズする:
- 行をカットして別の場所に貼り付けるには、行をカット をクリックします。
- 行をコピーして別の場所に複製を挿入するには、行のコピー をクリックします。
- カットまたはコピーした行を選択範囲の前に貼り付けるには、Paste row before をクリックする。
- カットまたはコピーした行を選択範囲の後に貼り付けるには、Paste row after をクリックする。
- 列のプロパティを設定するには、書式を設定したい列を選択し、Table >Column をクリックし、表示されるメニューから以下の手順に従う:
- 選択範囲の前に列を挿入するには、Insert column before をクリックします。
- 選択範囲の後に列を挿入するには、 Insert column after をクリックします。
- 列を削除するには、Delete column をクリックします。
- 列を切り取って別の場所に貼り付けるには、列を切り取る をクリックします。
- 列をコピーして別の場所に複製を挿入するには、列のコピー をクリックします。
- カットまたはコピーした列を選択範囲の前に貼り付けるには、Paste column before をクリックします。
- 切り取りまたはコピーした列を選択範囲の後に貼り付けるには、Paste column after をクリックします。
- テーブル全体のプロパティを設定するには、Table >Table properties をクリックする。 資格情報の変更ダイアログダイアログ ボックスが開きます。
- Generalタブで、これらのオプションのいずれかをカスタマイズする:
- 幅
- 高さ
- セル間隔
- セル内のスペース
- ボーダー幅
- 表のキャプション
- テーブルのキャプションを表示する
- ボーダー幅
- 配置
- Advancedタブで、オプションのボーダー設定を行います:
- ボーダースタイル
- ボーダーの輪郭の色
- ボーダーの背景色
- 保存するをクリックします。
- Generalタブで、これらのオプションのいずれかをカスタマイズする:
- セルのサイズを変更するには、セル内を右クリックし、表示されるメニューからセルのサイズを変更することを選択します。プロパティ ダイアログ ボックスが開きます。幅、高さ、セルの種類、範囲、水平方向の配置、垂直方向の配置を調整します。
- 行のサイズを変更するには、次のいずれかの手順に従います。
- 増やしたい行の上にマウスを置き、カーソルが水平方向にサイズを変更する行を希望のサイズまでドラッグします。
- 行を右クリックし、表示されるメニューから行のサイズを変更することを選択します。プロパティ ダイアログ ボックスが開きます。行の種類、高さ、配置を調整します。 [詳細] タブをクリックして、境界線のプロパティを構成します。
- 列のサイズを変更するには、次のいずれかの手順に従います。
- 増やしたい列の上にマウスを置き、カーソルが垂直方向にサイズを変更する行を希望のサイズまでドラッグします。
- 列を右クリックし、表示されるメニューから列のサイズを変更することを選択します。プロパティ ダイアログ ボックスが開きます。幅、高さ、セルの種類、範囲、水平方向の配置、垂直方向の配置を調整します。[詳細] タブをクリックして、境界線のプロパティを構成します。
- テーブルのサイズを変更するには、次のいずれかの手順に従います。
- 表のセル内の任意の場所をクリックします。テーブルの周囲に青い枠線が表示されます。 青い部分をクリックテーブルの角をクリックして、希望のサイズまでドラッグします。
- テーブル内を右クリックし、表示されるメニューから「テーブルのプロパティ」を選択します。資格情報の変更ダイアログダイアログ ボックスが開きます。幅、高さ、セル間隔、セルパディング、境界線の幅、キャプション、配置を調整します。[詳細] タブをクリックして、境界線のプロパティを構成します。
- 保存するをクリックします。
- テーブル全体を削除するには、Table >Delete Table をクリックする。
- 回答内容の下にあるもっと編集したいバリエーションの横にある をクリックします。
- バリエーションを表示および編集するには、次の手順に従います。
- クリックバリエーションを編集。
- バリエーション名を更新します。
- タッチポイントを追加または削除します。
- セグメントを変更します。
- クリック 更新.
- バリエーションが複数存在する場合に削除するには、バリエーションを削除。
- 記事を保存して作業を続けるには、保存 をクリックします。
- 記事を保存してナレッジベースを閉じるには、Save & Close をクリックします。