
連絡先リストのテンプレートを作成する
前提条件
- Outbound > Contact List > Add, Delete, Edit, View permissions
- アウトバウンド>連絡先リストのテンプレート>追加、消去、編集、ビュー権限
- Outbound > Attempt Limits > View to add an attempt limit to the contact list
Create a contact list template to configure the columns required for building contact lists with an Import template. Use the contact list template and a contact list filter to create a reusable import template for building contact lists. Create a contact list template from the column information in a comma-separated values .csv formatted file.
To create a contact list template, follow these steps:
- [管理]をクリックします。
- アウトバウンドダイヤリングで、リスト管理をクリックします。
- クリック連絡先リストのテンプレートタブ。
- [新規作成] をクリックします。
- の中に連絡先リストのテンプレート名ボックスに一意の名前を入力します。 名前にはスペース、数字、特殊文字を含むことができますが、一意でなければなりません。
- In Add columns to Contact List Template with CSV file box, click Browse.
- .csvファイルを選択してクリック 開いた。 The Contact List Template Headers display. メモ: When you use this contact list template to create contacts lists, the leading and trailing white space is removed from the contact field in the contact lists. If you do not want to remove the white space from your contact lists, switch the Trim leading/trailing white space toggle to No.
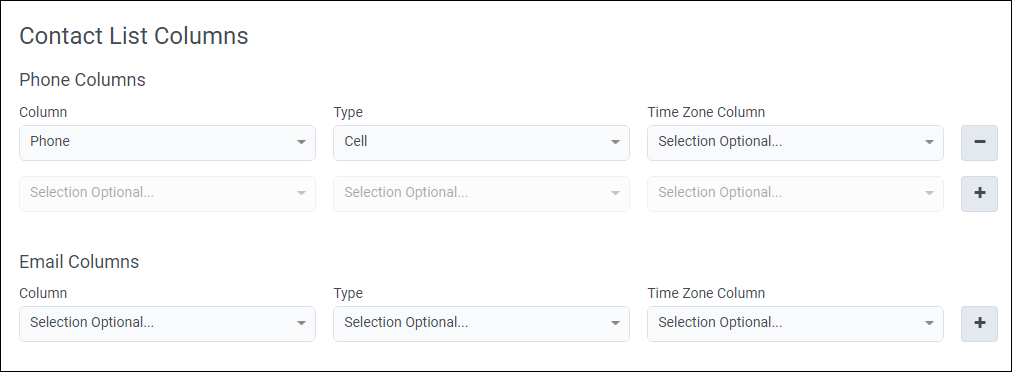
- In Contact List Columns, select the appropriate contact list columns to use by your contact list template when you create your contact lists. 連絡先リストには、電話番号と電子メールアドレスのいずれかまたは両方を含めることができます。 When you select phone numbers or email addresses, placeholders update and display as optional.

- To select phone numbers, follow these steps:
- In Phone Columns, in the Column box, select a column that contains phone numbers. メモ: リストごとに許可される電話番号列の最大数は10です。
- In the Phone Type box, select the type of number, for example, ホーム, Work, or Cell.
- 電話番号のタイムゾーンを含む列が連絡先リストにある場合、[タイムゾーンの列] ボックスでその列を選択します。 この手順は、構成の前提条件です 連絡可能な時間セット。 自動タイムゾーンマッピングを使用する予定の場合は、この手順をスキップしてください。
- 別の電話番号列を選択するには、次の手順を繰り返します。
- In Phone Columns, in the Column box, select a column that contains phone numbers.
- To select email addresses, follow these steps:
- In Email Columns, in the Column box, select a column that contains email addresses.メモ: The maximum number of email address columns allowed per list is 10.
- From the Email Type box, select the type of email address, for example, Personal or Work.
- 別のメールアドレス列を選択するには、次の手順を繰り返します。
- In Email Columns, in the Column box, select a column that contains email addresses.
- To select phone numbers, follow these steps:
- 連絡先リスト内の電話番号に対応するダイヤル時間をシステムに決定させる場合は、をクリックします。 はい 下 自動タイムゾーンマッピング。 メモ: 自動タイムゾーンマッピングは、電話番号でのみサポートされており、電子メールアドレスではサポートされていません。 自動タイムゾーンマッピングは、米国、カナダ、およびカリブ海の市外局番と米国の郵便番号でのみサポートされています。 詳細については、 自動タイムゾーンマッピングの概要。
- 自動タイム ゾーン マッピングを [はい] に設定し、連絡先リストに郵便番号を含む列がある場合は、郵便番号列ボックス、選択ジップ。 郵便番号は空白にすることができます。 自動タイムゾーンマッピングで最良の結果を得るには、電話番号と郵便番号の両方を使用してください。

- To use dynamic sorting in a campaign, specify the data type for the columns to use for sorting.
- Select Advanced, and for Column Data Type Specifications, in the Column box, select the columns to sort.
- Select the Data Type and properties for a selected column.
データ タイプ プロパティ 数字 最小 最大
選択した列の許容最小値および最大値を指定する。テキスト 最大長さ
選択した列の最大文字長を指定します。
すべてのテキスト列を合わせた最大長は 750 文字を超えることはできません。タイムスタンプ 標準の ISO 形式が必要です YYYY-MM-dd'T'HH:mm'Z'
受け入れ可能な形式は次のとおりです。
2017-07-15T15:45Z 分の精度

時間精度については 2017-07-15T15:00Z

日精度の場合は 2017-07-15T00:00Z
メモ: You can go back and edit a saved contact list template.
- 新しい連絡先リスト テンプレートを作成するには、保存。

連絡先リスト テンプレートを操作するには、アウトバウンド>リスト管理>連絡先リストのテンプレートタブで、連絡先リストのテンプレートを選択します。 あなたはできる編集、コピー、 または消去あなたのテンプレート。